


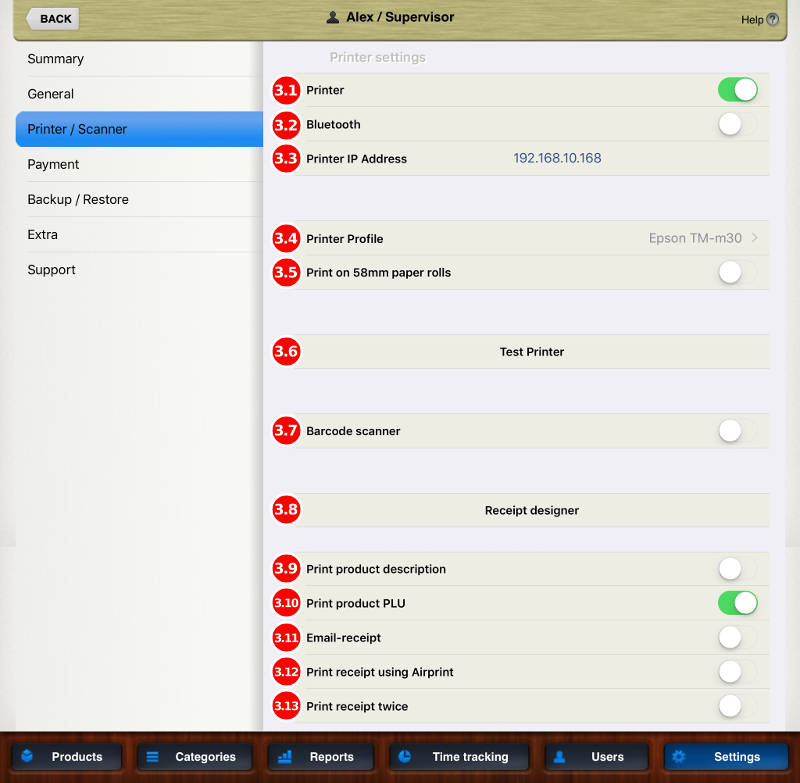
3.1 – Printer ON / OFF
Toggle the printing of receipts on/off. There are some special configurations. See below under 3.3
3.2 – Bluetooth
Turning Bluetooth printing on will immediately start searching for connected printers. Please make sure, that your Bluetooth-Printer is already connected (paired) to the iPad before you activate this option. Otherwise the printer can not be found by Cashy-POS.
3.3 – Printer IP-Address
In case you use a network connected printer, enter here it’s IP-Address from your local network.
If you use a Bluetooth-Printer and connected it already using the above toggle (3.2) this field will automatically be populated with the connection data of the Bluetooth printer.
Please read the printer manual how to connect your printer to the network. More information about printer connectivity and supported printers is given in our support section ( LINK )
Special configurations if you connected a printer
| Printer Toggle | Printer IP-Address | Toggle »Email receipt» | RESULT |
| OFF | 000.000.000.000 | OFF | No receipt printed |
| ON | Valid IP-Address or name of BT-printer | OFF | A receipt is printed |
| ON | 000.000.000.000 or NO name of BT-printer | OFF | Cashy complains about printer configuration |
| OFF | 000.000.000.000 or NO name of BT-printer | ON | An email-receipt is generated |
| OFF | Valid IP-Address or name of BT-printer | OFF | No receipt printed, but printing is activated for »Receipt Copy» function. A connected drawer will open if Cash-button is used |
| OFF | Valid IP-Address or name of BT-printer | ON | A pup-up window asks to print, email or no receipt at all |
| ON | Invalid IP-Address | OFF | Cashy complains about printer configuration |
| ON | Valid IP-Address or name of BT-printer | ON | A receipt will be printed AND an email-receipt will be generated |
3.4 – Printer Profile
Choose here the profile corresponding to your printer model. If you want to try a not officially supported printer, try the profile »Epson Generic».
3.5 – Print on 58mm paper rolls
Some printer allow using tighter paper then the normal 80mm. Activate this option, if you wish printing on these 58mm large paper.
3.6 – Test printer
This function allows you to test the printer connectivity. You will get a confirmation message if the test passed successfully.
3.7 – Barcode scanner (default: OFF)
Activating this option allows using a normal barcode scanner. The scanner should be set to use the HID mode!
Important: If you use the drawer/printer combo »mPOP» from Star Micronics with the integrated mPOP-scanner attached, then let this option deactivated. There is a dedicated option for the integrated scanner near the mPOP-options above!
3.8 – Receipt Designer
With this function you can design and personalize the cash register receipt which will be printed or emailed for your customers.
Using the receipt designer of Cashy-POS, you can design several layouts for your receipts. You can choose one or more layouts to be printed for the same transaction.
Each additionally created layout can be fully customized.
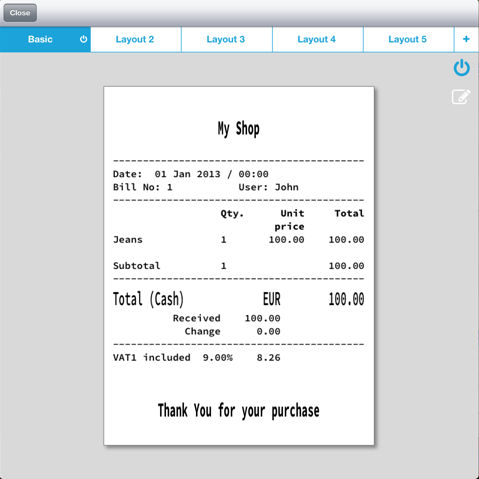
Entering receipt designer
Entering the receipt designer function you will get the actual design of the basic layout.
Editing basic layout, only logo, header and footer lines can be edited.
In order to fully customize your receipt layout, you need to add a new one.
![]() Edit the current layout
Edit the current layout
![]() Toggle ON/OFF this layout to be printed. Printable layouts will show the same icon in the corresponding tab
Toggle ON/OFF this layout to be printed. Printable layouts will show the same icon in the corresponding tab
![]() Add a new layout
Add a new layout
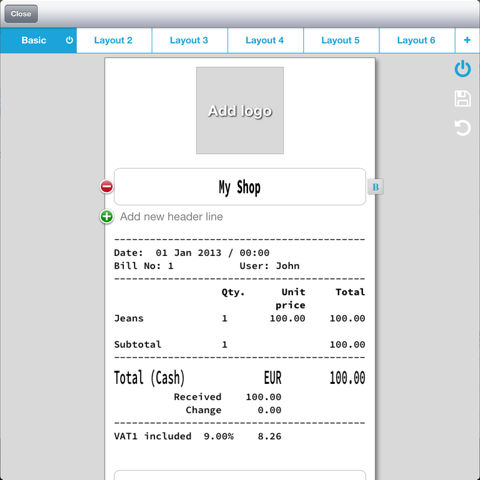 Editing the basic layout
– Using the red buttons and the green buttons you can add or remove rows according with your needs and design concept.
– Your shop logo can also be added at the top and a message for your customer at the bottom.
– With buttons on right side marked with letter «B» you can bold the corresponding line.
– First time you try to add a logo, the iPad asks you to allow access to the camera roll. Please respond yes, because the logo picker will take the logo from the camera roll.
![]() Apply the changes to the layout
Apply the changes to the layout
![]() Revert to the last saved version of the layout
Revert to the last saved version of the layout
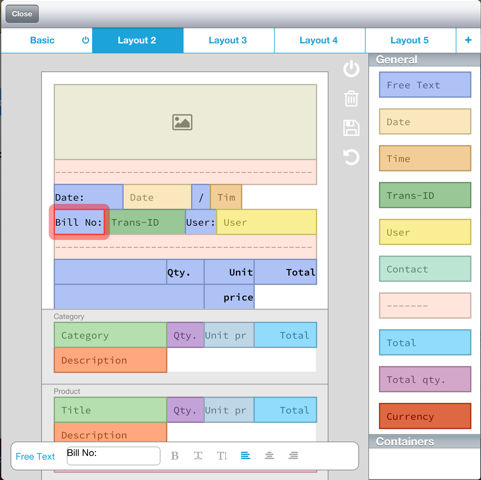
Customizing Layouts
— Receipts are structured in blocs, a kind of container with the fields finally printed placed inside it
— Some logical structures like f.ex. the total at the end of a transaction can not be altered
— To remove a bloc or field, swipe it outside the receipt. The size of field can be changed by taping on its border and swiping to the left or right side
— Choosing a container will show the corresponding fields on the left side as well as some general fields which could be added to that container
— Fields in lila colour are freetext fields where the text can be edited. All other colours are variables containing transaction data
— Taping onto a field or bloc will show its properties at the bottom. Text fields (lila) allow editing. For example: You can change from «Bill No:» to «Invoice Nr.»
— Formatting options like «Bold», «double length», «double height» and alignments are available to all fields
— Several layouts can be selected as printable. A new layout will automatically become printable. If you do no wish to have printed any layout, use the corresponding icon (see above) to turn printing off for each layout.
3.9 – Print Product Description (default: OFF)
If set to ON it will print the description-field from the product onto the receipt. If this field does not contain any data, it will not be printed, even if this toggle is turned ON.
The field »Description» can be set for each product on the page Products.
3.10 – Print product PLU (default: ON)
OFF will not print the product number (PLU) onto the receipt.
3.11 – Email Receipt (default: ON)
ON will open an email-form containing a pdf-file showing the actual receipt. The »to:» address field of the email form is pre-set with the default email address you defined in the «Email»-field of the General settings.
3.12 – Print receipt using AirPrint (default: OFF)
This option allows to print the receipt to an AirPrint enabled printer. Due to the implementation of AirPrinto into iOS you will be asked each time to which printer it should print. If the AIrPrint printer does not have options to use other then A4 paper, the receipt will be expanded to that format.
3.13 – Print receipt twice (default: OFF)
All the printable receipts selected in the receipt designer will be printed twice.
Important: If this option is deactivated and you still get more then one receipt, then you probably have several receipt layouts activated inside the receipt designer!
All subjects of english help here: LINK