


General Information
To access the Settings page a password is required.
Only the supervisor can access the Settings page.
There you can find the settings for the desk-top application, sync, and for the printer. You can also set different payment methods, the VAT %, the currency and the language as well the rounding level. There is also a special feature, which allows you to design the client receipt.
The settings menu contains 7 sections displayed as distinctive lines on the screen’s left side. Tapping them, each one will display the details on the screen’s right side.
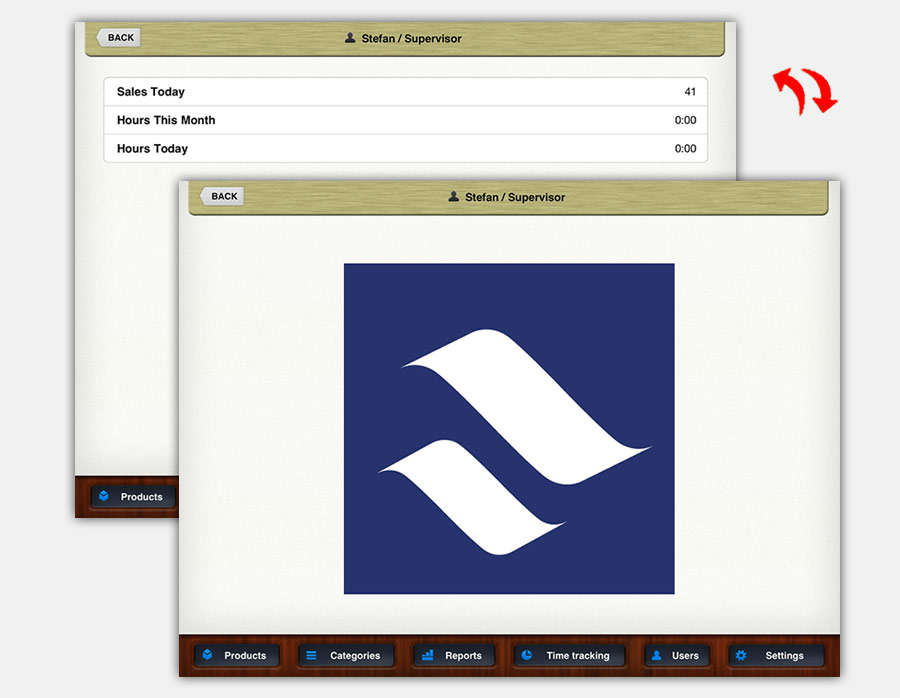
On the bottom bar there are another 5 buttons. Tapping on them you will be guided to a new page corresponding by case to a specific management section. Each page has in the top-left corner the BACK button, which will guide you to the previous section, and the Help (?) button, which you may tap in case you will need more information. On the middle-top page is shown the name of the person assigned as Supervisor or Seller using the Cashy-POS at the present moment.
1 – Summary
Displays all current settings of your Cashy-POS installation.
Till-ID is a random generated identifier of your iPad based on its hardware. It is not identical with the UDID (unified device identifier) assigned from Apple to any of their devices. The Till-ID is printed on any report and receipt from Cashy-POS. So it’s always possible to track down a certain report or receipt to the issuing device. The Till-ID can not be edited or removed.
For best results, please do not forget to check, from time to time, and update your Cashy-POS version !
2 – General Settings
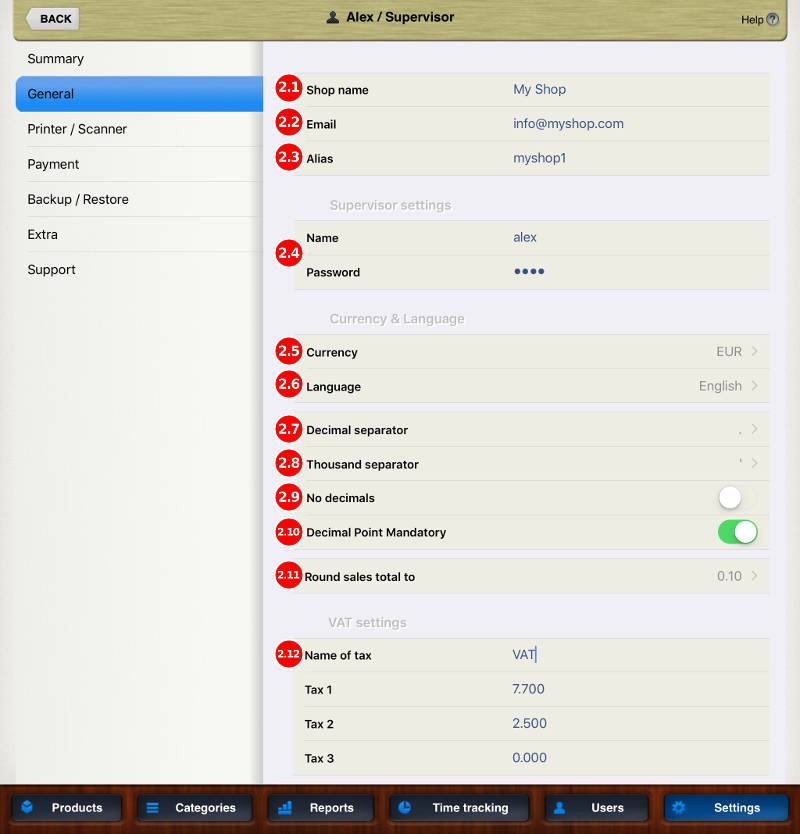
2.1 – Shop Name
In this field you can type the name of your shop. This name will be mentioned or printed on several reports.
2.2 – Email
In this field you can type the default e-mail address where Cashy-POS will send the reports.
2.3 – Alias
This field is used in conjunction with the dedicated reporting application. Please do not use any white space characters. Also avoid any special characters like »ö, à, é, &, etc»
2.4 – Supervisor Settings
In this section you can assign a name for the person delegated as Shop Supervisor. Normally the field shows the name of the first user generated during initial install.
You can not change the security-question of the supervisor here. To do so, choose the section »Users» (bottom bar).
2.5 – Select Currency
Choose the international 3-letter code of the currency you wish to use for Cashy-POS. As example: CHF for «Swiss Francs» or EUR for EURO.
2.6 – Select Language
Choose the language you want for Cashy-POS. After you will choose the language, all the buttons and functions of Cashy-POS will change to the language you have chosen.
If you find somewhere an item we forgot to translate or where you think the translation could be better, then please inform us using the CONTACT-FORM
2.7 – Decimal Separator
You can choose a coma (,) or a dot (.) as decimal separator.
Notice: It is not possible to use same characters for thousands and decimal separators.
2.8 – Thousand Separator
You can choose a coma (,) a dot (.) or an apostrophe (‹), as thousand separator.
Notice: It is not possible to use same characters for thousands and decimal separators.
2.9 – No decimals (default OFF)
Turning ON the displayed amount will show no decimals at all. Decimal amounts will automatically be rounded to the next integer
2.10 – Decimal separator mandatory
Activating this option will force the cashier using the decimal separator when entering an amount through the numeric keyboard.
For example:
If desactivated, an amount like »67.90» or »10» can be entered using two methods:
- Taping »6790» or »1000»
- Taping »67.90» or »10.»
If activated, only the second method will work
2.11 – Round sales total to
In some countries not all coins are available or used. For example smallest coin in Switzerland is 5 (0.05), or in Thailand the satang-denominated coins are legal tender, small shops usually don’t accept them any more.
This function rounds the sales total in order to reach a total sum of the receipt being a multiple of the chosen option.
Tapping the button, will open a window where you can choose the adjustment level by ticking the button nearby the written value.
Examples :
- Option »0.10» : The receipt-total of »13.26» will be rounded to reach a total of »13.30»
- Option »0.05» (e.g. Switzerland) : The receipt-total of »13.26» will be rounded to reach a total of »13.25»
- Option »100.00» : The receipt-total »234.00» will be rounded to reach a total of »200.00»
2.12 – Name of Tax
You can give your own name to the tax (e.g. VAT, GST or HST).
In the fields corresponding to Tax 1, Tax 2 or Tax 3 you can assign a VAT rate.
Important: These settings can not be changed in the free version (Cashy-POS Lite)
Place the products/services with same VAT rate into a category with the corresponding VAT assigned. Based on VAT values assigned to each category, Cashy-POS will automatically calculate the sales price, and will show the amount on the sales receipt.
3 – Printer /Scanner
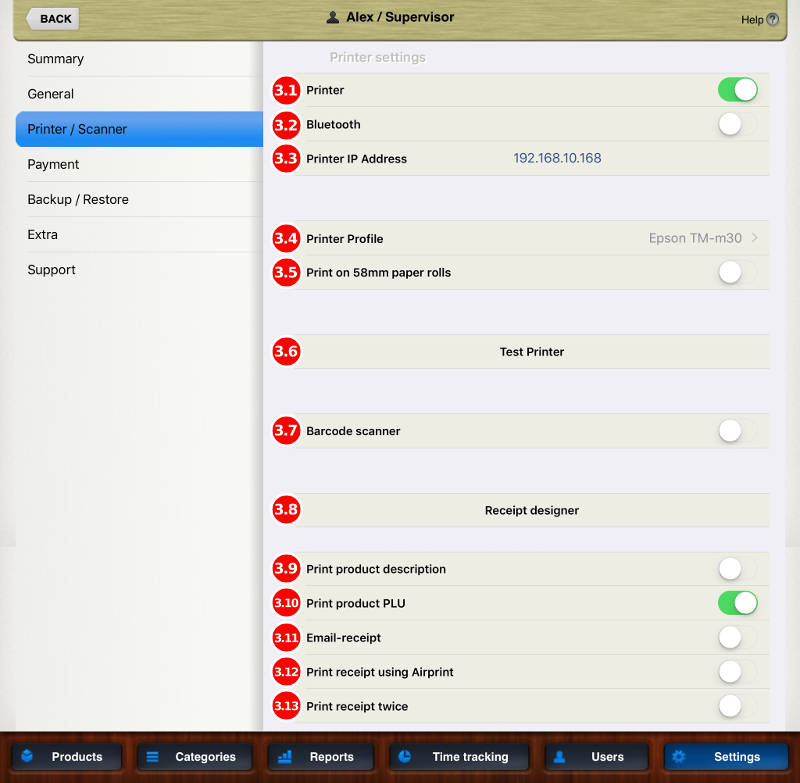
3.1 – Printer ON / OFF
Toggle the printing of receipts on/off. There are some special configurations. See below under 3.3
3.2 – Bluetooth
Turning Bluetooth printing on will immediately start searching for connected printers. Please make sure, that your Bluetooth-Printer is already connected (paired) to the iPad before you activate this option. Otherwise the printer can not be found by Cashy-POS.
3.3 – Printer IP-Address
In case you use a network connected printer, enter here it’s IP-Address from your local network.
If you use a Bluetooth-Printer and connected it already using the above toggle (3.2) this field will automatically be populated with the connection data of the Bluetooth printer.
Please read the printer manual how to connect your printer to the network. More information about printer connectivity and supported printers is given in our support section ( LINK )
Special configurations if you connected a printer
| Printer Toggle | Printer IP-Address | Toggle »Email receipt» | RESULT |
| OFF | 000.000.000.000 | OFF | No receipt printed |
| ON | Valid IP-Address or name of BT-printer | OFF | A receipt is printed |
| ON | 000.000.000.000 or NO name of BT-printer | OFF | Cashy complains about printer configuration |
| OFF | 000.000.000.000 or NO name of BT-printer | ON | An email-receipt is generated |
| OFF | Valid IP-Address or name of BT-printer | OFF | No receipt printed, but printing is activated for »Receipt Copy» function. A connected drawer will open if Cash-button is used |
| OFF | Valid IP-Address or name of BT-printer | ON | A pup-up window asks to print, email or no receipt at all |
| ON | Invalid IP-Address | OFF | Cashy complains about printer configuration |
| ON | Valid IP-Address or name of BT-printer | ON | A receipt will be printed AND an email-receipt will be generated |
3.4 – Printer Profile
Choose here the profile corresponding to your printer model. If you want to try a not officially supported printer, try the profile »Epson Generic».
3.5 – Print on 58mm paper rolls
Some printer allow using tighter paper then the normal 80mm. Activate this option, if you wish printing on these 58mm large paper.
3.6 – Test printer
This function allows you to test the printer connectivity. You will get a confirmation message if the test passed successfully.
3.7 – Barcode scanner (default: OFF)
Activating this option allows using a normal barcode scanner. The scanner should be set to use the HID mode!
Important: If you use the drawer/printer combo »mPOP» from Star Micronics with the integrated mPOP-scanner attached, then let this option deactivated. There is a dedicated option for the integrated scanner near the mPOP-options above!
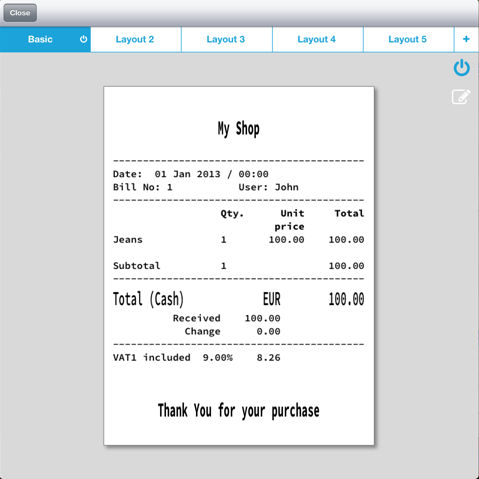
3.8 – Receipt Designer
With this function you can design and personalize the cash register receipt which will be printed or emailed for your customers.
Using the receipt designer of Cashy-POS, you can design several layouts for your receipts. You can choose one or more layouts to be printed for the same transaction.
Each additionally created layout can be fully customized.
Entering receipt designer
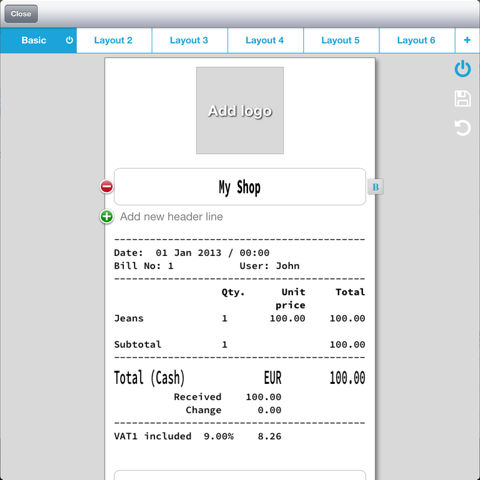
Entering the receipt designer function you will get the actual design of the basic layout.
Editing basic layout, only logo, header and footer lines can be edited.
In order to fully customize your receipt layout, you need to add a new one.
![]() Edit the current layout
Edit the current layout
![]() Toggle ON/OFF this layout to be printed. Printable layouts will show the same icon in the corresponding tab
Toggle ON/OFF this layout to be printed. Printable layouts will show the same icon in the corresponding tab
![]() Add a new layout
Add a new layout
 Editing the basic layout
– Using the red buttons and the green buttons you can add or remove rows according with your needs and design concept.
– Your shop logo can also be added at the top and a message for your customer at the bottom.
– With buttons on right side marked with letter «B» you can bold the corresponding line.
– First time you try to add a logo, the iPad asks you to allow access to the camera roll. Please respond yes, because the logo picker will take the logo from the camera roll.
![]() Apply the changes to the layout
Apply the changes to the layout
![]() Revert to the last saved version of the layout
Revert to the last saved version of the layout
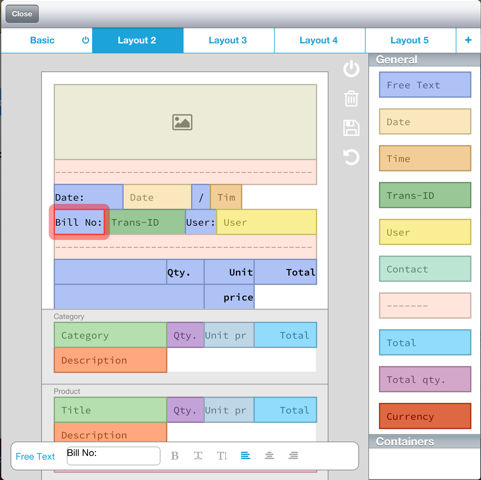
Customizing Layouts
— Receipts are structured in blocs, a kind of container with the fields finally printed placed inside it
— Some logical structures like f.ex. the total at the end of a transaction can not be altered
— To remove a bloc or field, swipe it outside the receipt. The size of field can be changed by taping on its border and swiping to the left or right side
— Choosing a container will show the corresponding fields on the left side as well as some general fields which could be added to that container
— Fields in lila colour are freetext fields where the text can be edited. All other colours are variables containing transaction data
— Taping onto a field or bloc will show its properties at the bottom. Text fields (lila) allow editing. For example: You can change from «Bill No:» to «Invoice Nr.»
— Formatting options like «Bold», «double length», «double height» and alignments are available to all fields
— Several layouts can be selected as printable. A new layout will automatically become printable. If you do no wish to have printed any layout, use the corresponding icon (see above) to turn printing off for each layout.
3.9 – Print Product Description (default: OFF)
If set to ON it will print the description-field from the product onto the receipt. If this field does not contain any data, it will not be printed, even if this toggle is turned ON.
The field »Description» can be set for each product on the page Products.
3.10 – Print product PLU (default: ON)
OFF will not print the product number (PLU) onto the receipt.
3.11 – Email Receipt (default: ON)
ON will open an email-form containing a pdf-file showing the actual receipt. The »to:» address field of the email form is pre-set with the default email address you defined in the «Email»-field of the General settings.
3.12 – Print receipt using AirPrint (default: OFF)
This option allows to print the receipt to an AirPrint enabled printer. Due to the implementation of AirPrinto into iOS you will be asked each time to which printer it should print. If the AIrPrint printer does not have options to use other then A4 paper, the receipt will be expanded to that format.
3.13 – Print receipt twice (default: OFF)
All the printable receipts selected in the receipt designer will be printed twice.
Important: If this option is deactivated and you still get more then one receipt, then you probably have several receipt layouts activated inside the receipt designer!
4 – Payment Methods
Here you can name up to 6 payment methods. They will be displayed on buttons of the main screen.
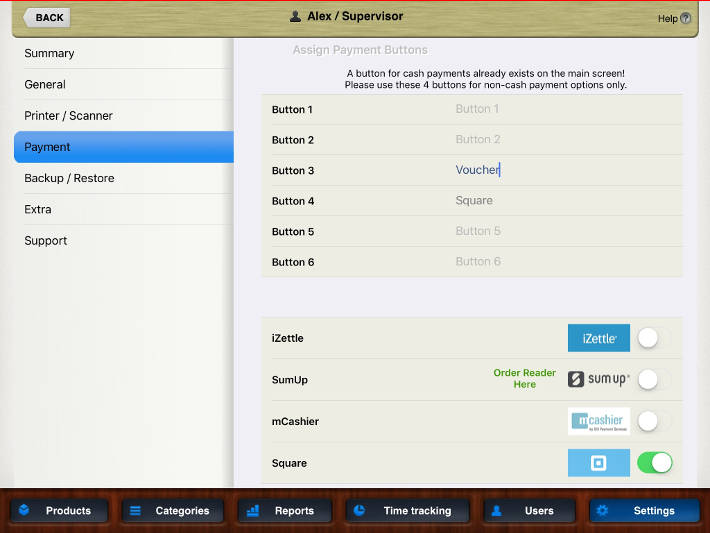
Important: Please note, that a »Cash»-button is by default displayed on main screen. No need to create a dedicated one. Only the predefined »Cash» button will open a drawer if a transaction is closed.
Some integrated payment providers like iZettle, SumUp, Square, etc. can be toggled on here. They will use button number 4!
5 – Backup / Restore
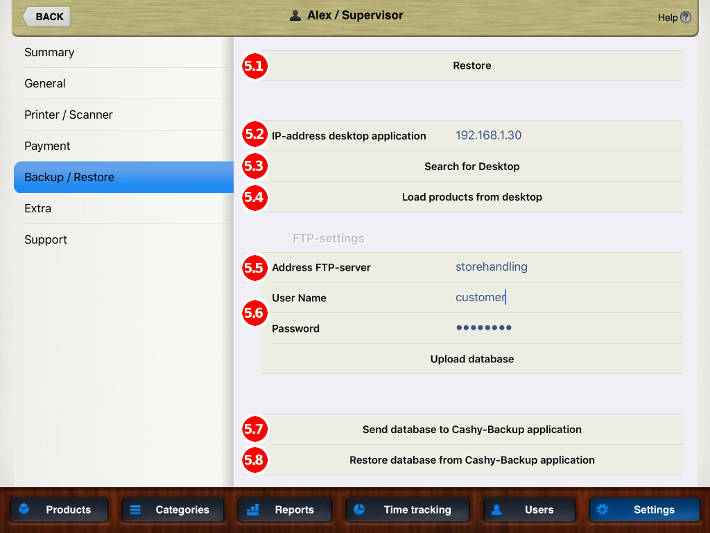
5.1 – Restore
Using this function you can restore ALL data and settings of Cashy-POS from a backup database.
How to restore from a backup-file:
- Download and install the desktop-application from our website. It is available in a Mac and a Windows version.
- Use the function «Load DB» inside the desktop-application to load a database from one of your close-day emails (has to be unpacked from a zip-file first).
- Tap «Restore» inside the Cashy-POS settings and enter the IP-address of the desktop application
- READ and confirm the several warnings and wait until you get the success message
- Now close Cashy-POS completely (also from multitasking in background!)
- Restart Cashy-POS and continue registering sales
5.2 – IP address desktop application
If you downloaded the desktop-application from our website you enter here the IP-address of your desktop-computer.
Using the desktop-application you can add and edit products and categories on your desktop-computer. This is more comfortable then doing it directly on the iPad.
5.3 – Search for Desktop
If you don’t know the IP-address of your desktop-computer, press the «Search for Desktop«- button Cashy-POS then will scan the network for the running desktop-application. Don’t forget to start the desktop application and make sure that your iPad is using the same network as your desktop-computer.
5.4 – Load from Desktop
This function will load products, categories and corresponding VAT-settings to your iPad. All data in «Products» and «Categories» will be overwritten by the data existing at the present moment in the desktop-application. Make sure you have a recent backup-file available!
FTP-Settings
You can define an FTP server to upload your database (eg. backup)
5.5 – Address FTP-server
Enter here the address of your FTP server. If you are using a different port than standard port 21, add the port after the IP address separated by double point «:» (eg. 123.456.789.1:2121)
5.6 – Benutzername /Passwort
Enter your credentials for the FTP-Server here
Use »Upload» to start transferring the database onto your FTP-server
5.7 – Send database to Cashy-Backup application
This function links the Cashy-POS app with Cashy-Backup app and allows you to send the database of Cashy-POS containing all settings, sales and products directly onto another device (NO cloud data storage !).
Tapping the button, Cashy-POS starts searching for an active instance of Cashy-Backup running onto another device in the same network. Please make sure that you activated the function «Receive database» in Cashy-Backup in order to become discoverable by Cashy-POS.
Cashy-Backup is available for iPod touch, iPhone and iPad. The iOS version 5.1.1 or higher is requested.
In the upcoming pop-up window, choose now the device where to send your database and enter the code shown on Cashy-Backup app (pairing).
After the transfer is done, a success message will inform you about the status. On Cashy-Backup you may check the transfer using the button Show received database. You will see there the list of all backup files received. Tap and hold onto any of these databases to rename or delete it.
5.8 – Restore database from Cashy-Backup application
This allows you to restore all data of Cashy-POS using the backup files previously saved in Cashy-Backup on another device.
On the Backup device, tap Send database and select the file from the list displayed by Cashy-Backup. Then enter the provided code into the Cashy-POS empty field displayed after tap the Restore database from Cashy-Backup app.
Attention: All existing data of Cashy-POS will be replaced by the data sent through Cashy-Backup!
6 – Extra
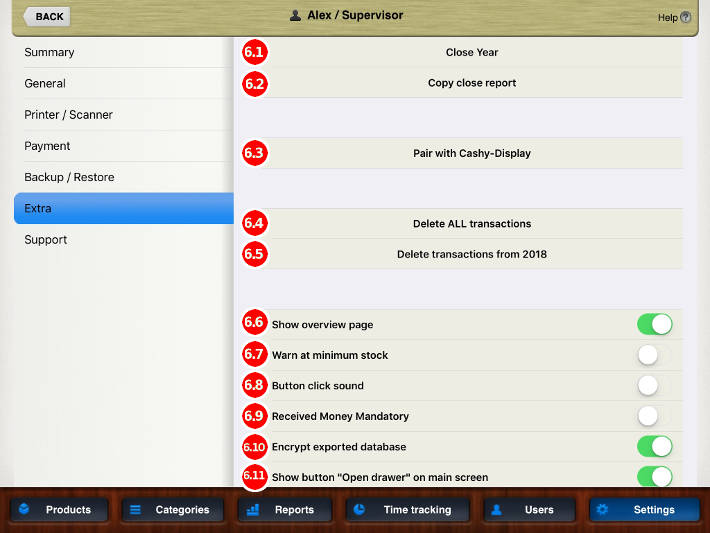
6.1 – Close Year
This function allows closing a year
Clicking on this button will open a window with two options:
- X-Report button will execute X-Close (a close year for information purpose only)
- Z-Report button will execute the Z-Close of the year, which can not be repeated, reverted or modified later on.
You will be directed to a new window where you can choose the way you would like to have the report;
- Print report
- Mail report
- Print AND email report
- Upload reports to FTP-Server
- Upload AND print reports
If you forgot something, if you remembered something, or if you are not sure 100% that you want to close the year, you now have the last chance to abort the operation by taping »Cancel».
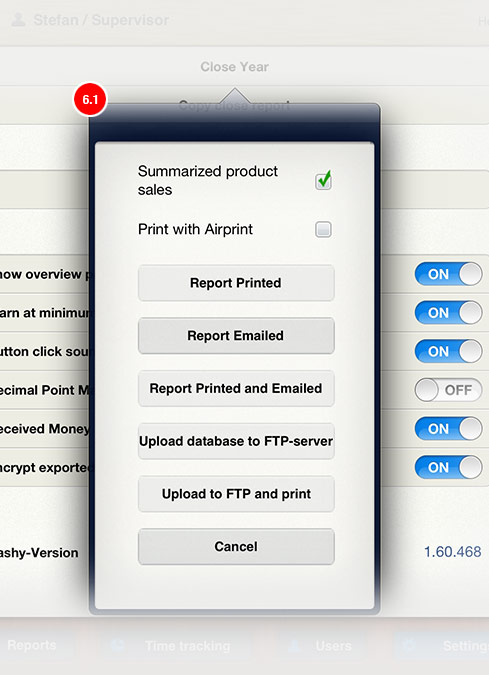
Functionality:
Summarized product sales : Will summarize and add the products sold (total sales and total items) to the report. This option is turned on by default.
Print with Airprint : Instead of printing the report onto the receipt printer it is possible to print directly onto an airprint enabled printer. You can choose between landscape and portrait mode.
6.2 – Copy Close Report
Is generating a copy of a close report. In the pop-up window you can choose the date. Confirming the report, in the next pop-up window you will have 6 options, the usual ones for closing a day, month, year.
6.3 – Pair with Cashy-Display / Cancel pairing with Cashy-Display
Cashy-Display is a dedicated application for iPhone, IPod touch and iPad used to display the ongoing transaction to the customer.(min. iOS 5.1.1 is requested)
Through this function you can connect the customer display with the Cashy-POS transaction screen.
On the customer display, previously installed with Cashy-Display app, tapping the button pair with Cashy-POS you will see a code. Insert that code in the pop-up window opened after you tapped Pair with Cashy-Display (on your Cashy-POS) and choose the device used as Customer Display. (see please Help – Main Screen)
To stop the connection between the devices you just tap on one of them cancel pairing button.
6.4 – Delete ALL Transactions
This button will delete all transactions registered since the last installation or the last action «Delete ALL transactions» until the present moment.
Due it’s highly importance, the function is protected by Password and Security question.
Deleting transactions will not affect any other data like products, categories, users, etc.
Important: This function will force you to first execute a backup of your existing database by mailing it to yourself. The mail you get will contain an attachment including a code. You must enter this code from the received backup-mail before the deletion command will be executed.
6.5 – Delete Transactions from (oldest year)
Here you can delete the transactions from the first year you started using Cashy-POS. Once the 1st years transactions are deleted, the next (2nd) years data is offered to delete.
Important: This function will force you to first execute a backup of your existing database by mailing it to yourself. The mail you get will contain an attachment including a code. You must enter this code from the received backup-mail before the deletion command will be executed.
6.6 – Show overview page (default: ON)
Toggle ON/OFF to show the overview page when entering «manage Cashy» from main screen. If turned OFF, instead of the statistical values the Cashy-POS logo is displayed.
6.7 – Warn at minimum stock (default: ON)
ON will give you a warning message when your stock decrease under the minimum value you set in the product options. This value can be set for each product on the page »Products».
The warning only appears once and shows the remaining items of this product.
6.8 – Button click sound (default: ON)
ON will play a click sound at every button press. You can define its volume using the iPads settings.
6.9 – Decimal Point Mandatory (default: OFF)
Activating this option will force the user entering the decimal separator.
Cashy-POS team worked many years with cash registers. We found out that in some places the employees preferred to enter an amount like »76.90» without typing the decimal point between »76» and »90». So they enter 7690 and it will show as 76.90 everywhere.
6.10 – Received money mandatory (default: OFF)
ON – The seller is obliged to enter the money he received from the customer as payment for the products sold, before closing the transaction.
Cashy-POS will show the amount the seller must return to the buyer. All these details will be recorded on the reports and also on the client receipt. This information is helpful to detect and correct possible irregularities in the daily cash-management.
This option is applicable only for cash payments and not for cards or other payment methods (the other payment-buttons).
6.11 – Encrypt exported database (default: ON)
If activated, the ziped DB will be password protected for transfer, using the supervisor password.
6.11 – Show button «Open drawer» on the Main Screen (default: OFF)
Activation this option will add the »Open Drawer» function to the main screen
7 – Support
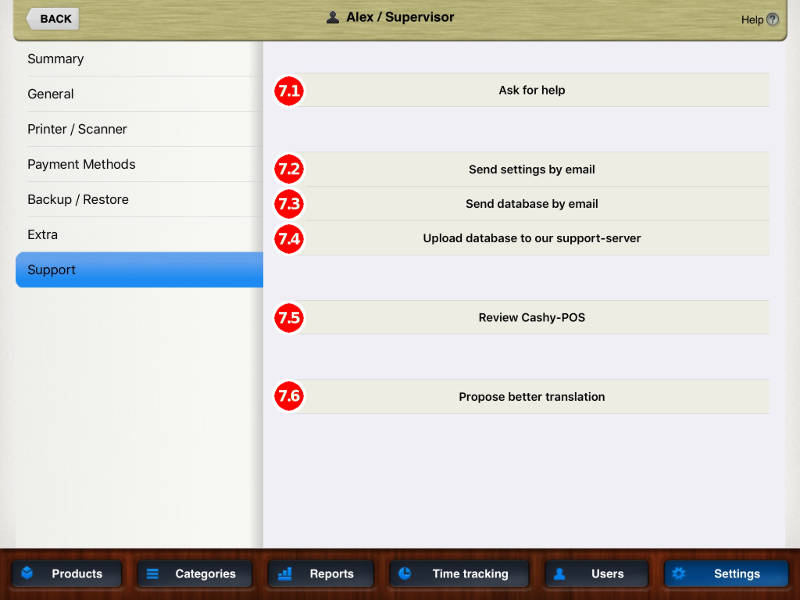
7.1 – Ask for help
In case you already have read the HELP and FAQ’s files and you still did not found a solution for your problem, please press this button.
You will be redirect onto our contact form where you please describe your problem as detailed as possible.
We will do our best to solve your problem in the shortest time.
7.2 – Send settings by email
Sometime to solve a difficult problem we may ask you to let us know your settings. Then please press this button. An email format will open, having attached a PDF file containing your Cashy-POS settings.
7.3 – Send database by email
Sometime to solve a problem generated by a manipulated/corrupted database we may ask you to let us see your DB in order to analyse the failure. Then please press this button. An email format will open, having attached a ZIP file containing your DB.
7.4 – Upload database to Support-Server
Using this function, a password-protected copy of your database will be transmitted onto our own server.
Please use this function only if requested by our support staff!
7.5 – Review Cashy-POS
We will be very glad to know that you are happy, Cashy-POS fulfils your expectation and you share these with our business community. This button will lead you to the AppStore where you can write down your opinion about this application
Buy full version (Lite version only)
This function leads you to the AppStore where you can purchase the full version of Cashy-POS after you have tested in depth the Lite (Test-) version.
In case you want to take over the data and settings you entered during testing period, please contact us. We created an undocumented function for this purpose!
7.6 – Propose better translation
We spent a lot of time translating Cashy-POS into different languages. But we are not native speakers of all these languages.
So it’s very probably, that some translations are not perfect. Using this function, you will be leaded to a special form which allows you proposing translation enhancements. We will include this propositions into one of the next updates.
Use this form form to propose a better translation : LINK